Aerial Views In No Time!
When using a DJI drone, you can select “Sphere” mode to automatically capture the necessary images.
We will use the RAW images to manually stitch each 360 image instead of the automatically-produced JPG photo.
If you don't have the "Sphere" mode or are using a different drone, follow the manual instructions below.
AUTOMATIC: "Pano Mode"
1: Open SETTINGS
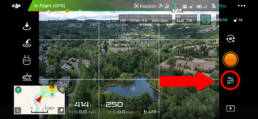
2: Select CAMERA mode, click PHOTO
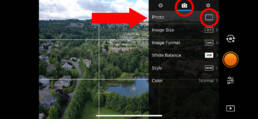
3: Open PANORAMA options
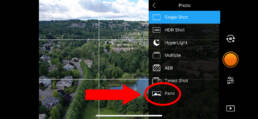
4: Select SPHERE

4: Open photo SETTINGS, choose RAW
You may have to toggle "Save Original Panorama" to open this.
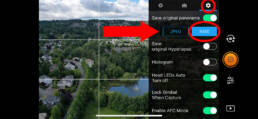
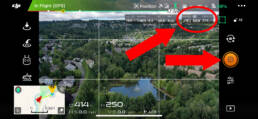
4: Verify RAW, press SHUTTER to shoot 360
The drone will automatically begin shooting enough images to fill the entire 360 view. However, since it will not shoot directly up, we will Photoshop the sky afterward. (Don't worry about the "Footage: JPG" as long as you see the RAW label next to it.)
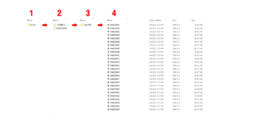
4: Locate the 360 files
Plug the memory card into your computer. Open the DCIM foler, select PANORAMA, then you will find a list of folders containing each shot. Those folders will contain the individual RAW photos that we will use to merge the final 360 image.
MANUALLY SHOOTING
Shoot, Rotate, Repeat
Unlike the automatic mode above, you will need to manually shoot all of the images. We will manually stitch the images together using software on the computer.
Shoot everything in RAW so we can manually adjust the white balance, exposure, etc.
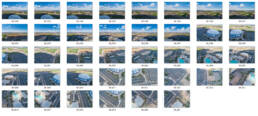
The trick is to overlap each shot by about 40% so the software has plenty of room to merge the files. When I do it this way, I usually end up with around 40-50 or so shots. When in doubt, shoot more than you think. In the example below, you can see there are a few duplicate shots (such as the first 2). It is better to over-shoot than accidentally skip a spot.
Keep the drone as still as you can and simply rotate in a 360. Start above the horizon, if you can, and after a full rotation of shots lower the camera to move the bottom 40% of the screen to the top. Then another rotation of shots. Keep going until you shoot straight down.
You should have a group of images that look something like this: